Use Admin Settings to connect your organization’s communication channels and LLM providers, then give team members access to the tools and conversations they need. This guide explains how to set up WhatsApp, Facebook Messenger and Instagram, connect an LLM provider, and manage agents and roles.
TQRFlow can also use connected data sources—including e-commerce platforms, databases, blogs, and video or audio platforms—throughout its workflows. The instructions below focus on channel connections, LLM providers, and team access.
Suggested setup order: Connect and test your channels, connect an LLM provider, create the roles your team needs, and then add agents with the appropriate role. Have the account details and credentials for the channels and LLM provider you plan to connect ready before you begin.
Connect social media and messaging channels
TQRFlow can connect to social media and messaging platforms through supported integrations. The available channels and setup requirements depend on the platform and the integrations enabled for your organization. For each channel, follow its connection instructions, authorize the required access, and test the connection before your team starts using it.
Some integrations use webhooks to deliver incoming messages or other events to TQRFlow. A webhook callback URL is the address where the platform sends those events. Other connection methods may apply, depending on the integration.
The sections below cover WhatsApp, Facebook Messenger and Instagram, which use Meta’s services. Their Meta-specific account, token and webhook instructions apply to those channels. Other platforms may require different credentials, permissions and setup steps.
Before you start. Your organization (called a tenant in TQRFlow) needs a WhatsApp Business number configured in its own Meta app. You will need the number’s Phone Number ID, the Business Account ID, a permanent access token, and the Verify Token supplied by your TQRFlow platform operator.
- Prepare the Meta connection. In your organization’s Meta app, add the WhatsApp product and create a system user. Generate a permanent access token with expiry set to Never and the
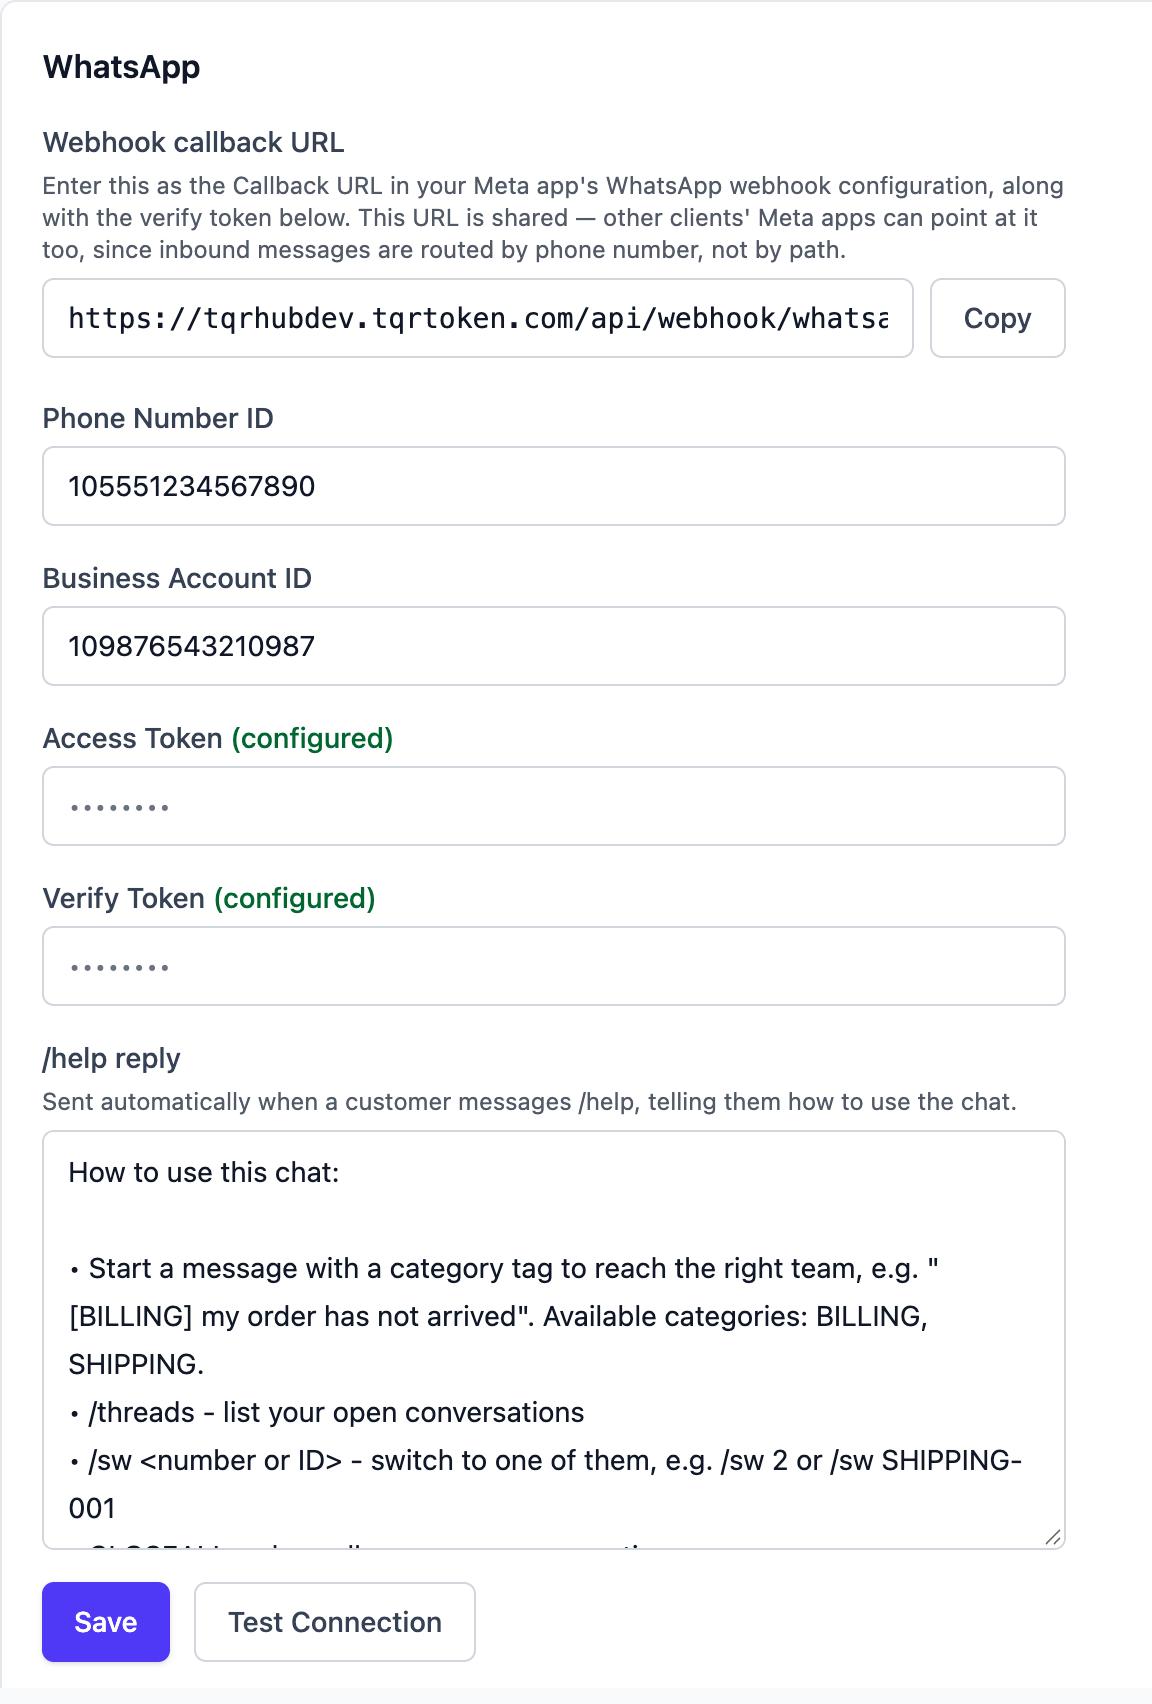
whatsapp_business_messagingandwhatsapp_business_managementpermissions. Copy the Phone Number ID and Business Account ID for the WhatsApp account you are connecting. - Save the connection in TQRFlow. Open Settings → WhatsApp. Enter the Phone Number ID and Business Account ID from Meta, paste the permanent Access Token, and enter the Verify Token supplied by your platform operator. Select Save, then Test Connection. The Access Token and Verify Token are separate values; enter each in its matching field.
- Configure the webhook in Meta. Copy the Webhook callback URL displayed on TQRFlow’s WhatsApp settings page into the WhatsApp webhook configuration in Meta. Enter exactly the same Verify Token you saved in TQRFlow, and subscribe to messages. Use the callback URL from your own settings page; the screenshot is an example.
- Test incoming and outgoing messages. From a personal phone, send a WhatsApp message to the connected business number. Check that it appears in Messaging Workflow, then reply from TQRFlow and confirm that the reply reaches the phone. This checks both directions of the connection.
Manage WhatsApp templates. Outside the 24-hour reply window, use a Meta-approved message template. Open Settings → WhatsApp → Templates and select Sync from Meta to retrieve your templates. To create a new template, write a draft and submit it to Meta for approval before using it.
Facebook Messenger and Instagram
First configure the webhook verification, then add the Facebook or Instagram page under Social Pages. Saving a Verify Token alone does not connect a page.
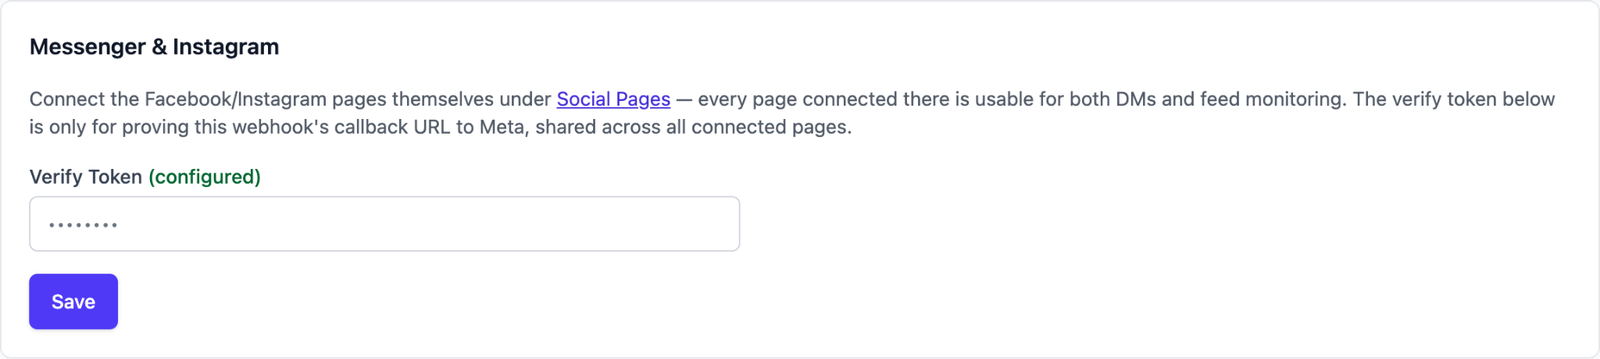
- Configure webhook verification. Open Settings → Messenger & Instagram, enter the Verify Token supplied by your platform operator, and select Save. In Meta, use your TQRFlow application’s address followed by
/api/webhook/messengeras the callback URL, and enter the same Verify Token. Use the address of your TQRFlow application, where your team signs in. - Prepare the Page access token. In Meta, subscribe the Page to messages and feed. Obtain a permanent Page access token with
pages_show_list,pages_messaging,pages_manage_metadataandpages_read_engagement. For Instagram, also addinstagram_basicandinstagram_manage_messages. The Social Pages connection requires a Page access token. In Meta’s Graph API Explorer, runGET /PAGE_ID?fields=name,access_token, replacingPAGE_IDwith the ID of the page you want to connect. Use the returnedaccess_tokenwhen adding that page in TQRFlow. - Add the page in TQRFlow. Follow the Social Pages link on the Messenger & Instagram settings tab. Choose Facebook or Instagram as the Platform, enter the Page ID and matching Access Token, and optionally add a descriptive Page Name. Select Add Page.
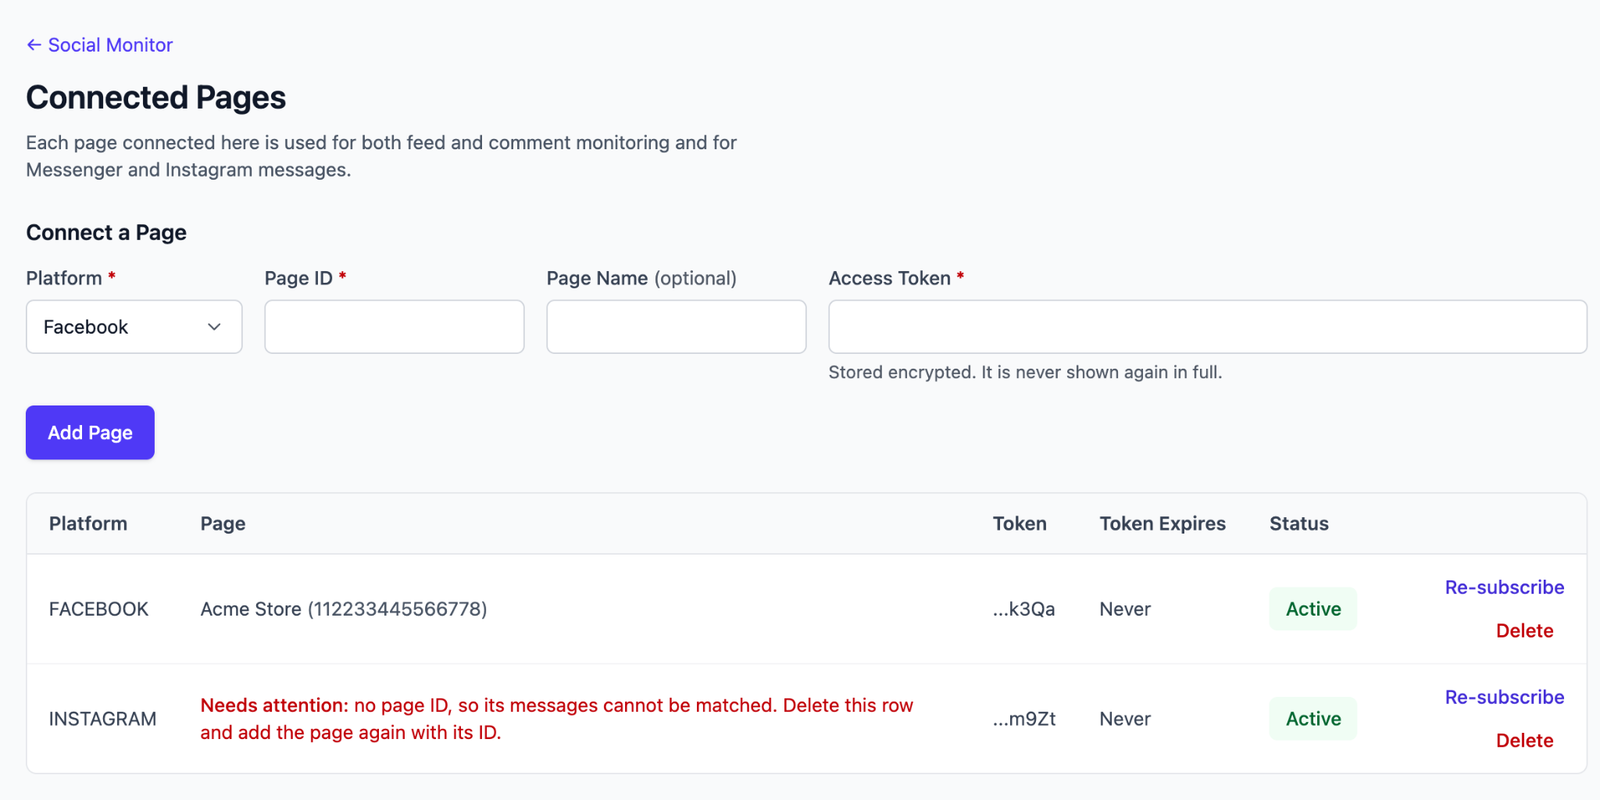
- Check the saved connection. Find the page in the Connected Pages table and confirm that its status is Active. Also check that the Page ID is present and belongs to the page you intended to connect. An Active status does not resolve a missing Page ID; the page must have an ID for incoming messages to be matched.
Review connected pages
The Connected Pages screen lists the Facebook and Instagram pages added to TQRFlow. Each connected page is used for both direct messages and feed or comment monitoring. Review any warning shown in the table, even if the status says Active.
Connect an AI model provider
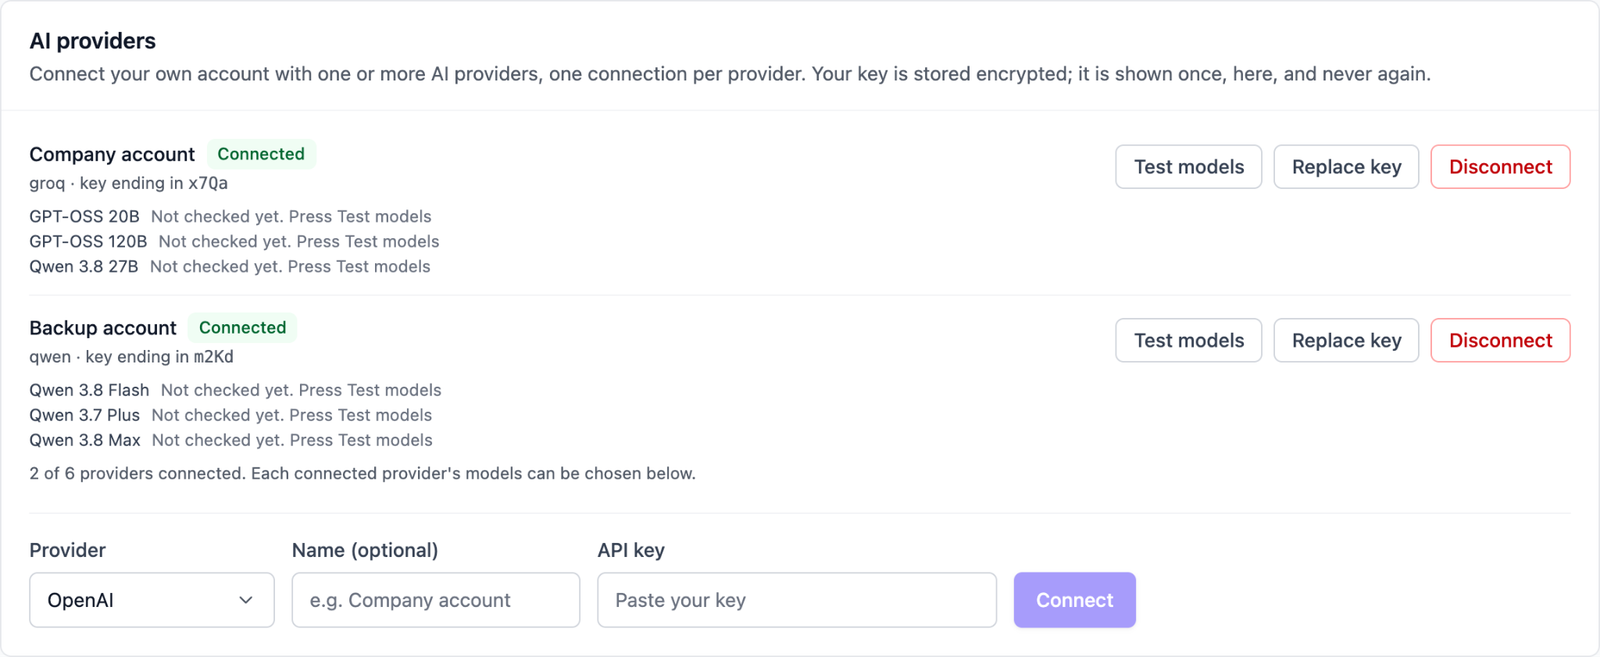
An LLM (large language model) provider supplies the AI models used by the platform. An administrator connects the provider account using its API key. The provider is the service, such as OpenAI or Anthropic; the API key authorizes TQRFlow to use that account.
- Open the provider settings. Go to Settings → LLM → LLM providers.
- Choose the service. Select Groq, OpenAI, Anthropic, Google Gemini, DeepSeek or Qwen from the Provider list.
- Identify and connect the account. Enter an optional name that your administrators will recognize, such as “Company account”. Paste the API key for the selected provider, then select Connect.
- Check the connection. Confirm that the account appears as Connected. Select Test models to check the available models; a model marked “Not checked yet” has not been tested.
Roles and access
A role defines which pages and features a team member can use. For WhatsApp conversations, the role’s Inbox Categories also determine which category queues and threads they can see. Assign roles according to each person’s responsibilities.
Full access gives access to every page. Reserve it for people who need administrative control. The Agents permission can assign Full access to other people, so treat it as an administrative permission too.
Add a person and choose a role
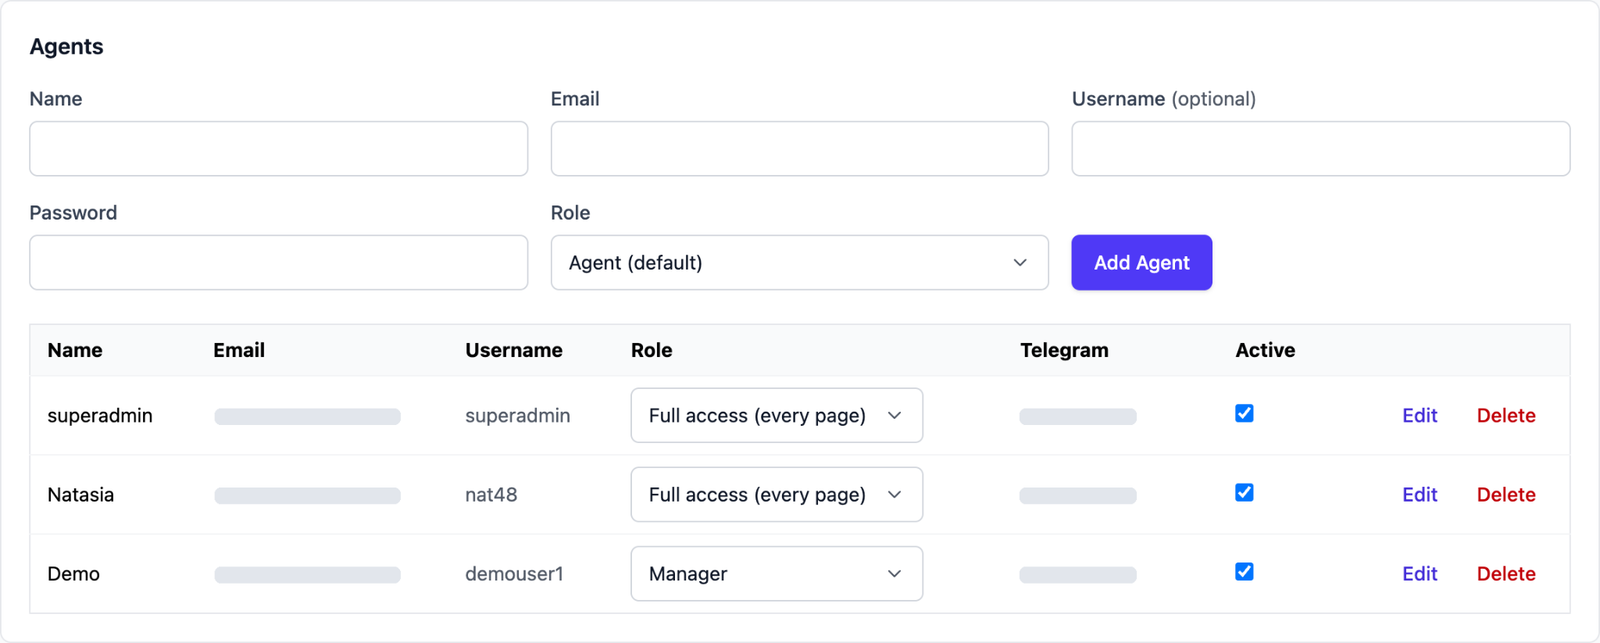
- Open agent management. Go to Settings → Team → Agents. In this guide, an agent is a person with a TQRFlow user account.
- Enter the person’s account details. Provide their name, a unique email address, an optional username, and a temporary password of at least 8 characters. Each email address can be associated with only one account on the platform.
- Assign access and add the agent. Select the role that matches the person’s job, then select Add Agent. Choose Full access only when they need access to every page. If the required role does not exist yet, create it using the steps below.
Create a role
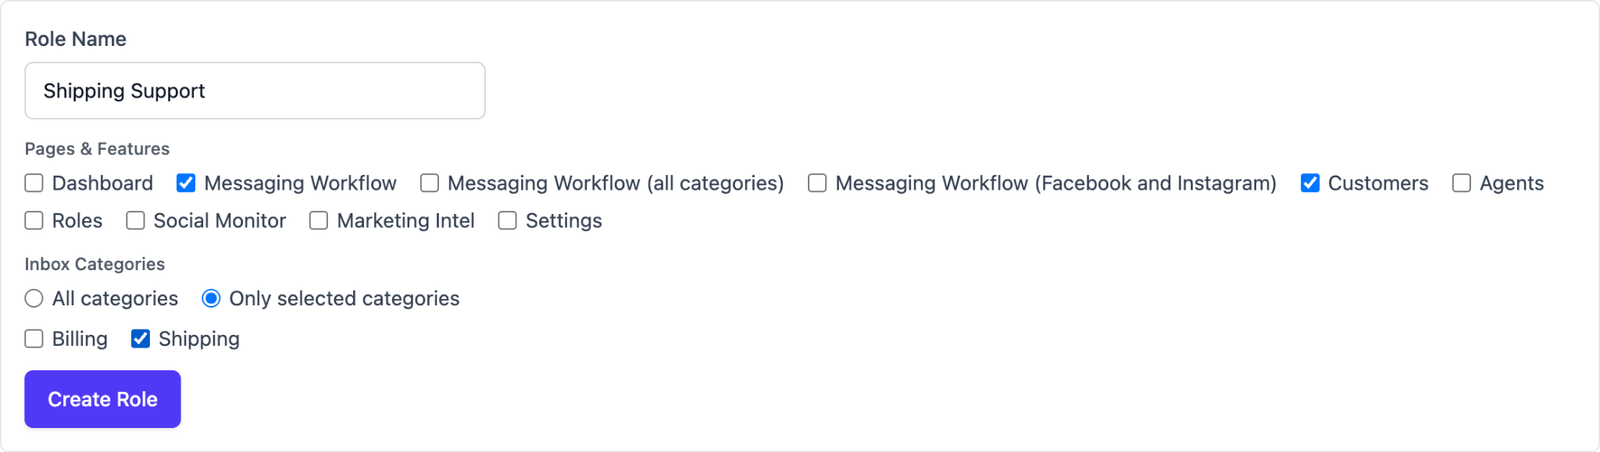
- Name the role. Open Settings → Team → Roles and enter a descriptive Role Name, such as “Shipping Support”.
- Choose the pages and features. Under Pages & Features, select the tools this role needs. Use the permission reference below to understand each option.
- Set WhatsApp category access. Under Inbox Categories, choose All categories for access to every category, or Only selected categories and select the allowed categories. These category limits do not restrict Facebook and Instagram Social Messages.
- Create and assign the role. Select Create Role, then assign it to the appropriate people under Agents. To update an existing role, select Edit in the roles table and review its pages, features and category access.

Example: Shipping Support
Goal. A delivery support team needs to answer Shipping conversations without access to Billing conversations.
Configure the role: Name it “Shipping Support”. Under Pages & Features, select Messaging Workflow and Customers. Under Inbox Categories, choose Only selected categories and select Shipping. Leave the other permissions unselected.
Expected result. An agent assigned this role can work with Shipping threads in Messaging Workflow and access the Customers directory. They do not receive access to Billing threads through Messaging Workflow. The Customers permission still opens customer records; category filtering should not be understood as hiding all billing-related information everywhere in the platform.
Permission reference
Select the permissions a role needs, then review the category settings separately. Page access and category access serve different purposes: one opens a tool; the other limits the WhatsApp conversations available through category-based views.
| Permission | What it opens | Notes |
|---|---|---|
| Dashboard | Attention items, recent conversations, latest reports and social activity. | Dashboard counts reflect the role’s allowed categories. |
| Messaging Workflow | WhatsApp category queues and threads. | WhatsApp queue and thread access follows the role’s Inbox Categories selection. |
| Messaging Workflow (all categories) | The All Categories queue and the Overview page. | Grants access to views spanning every category. Leave unselected for a role intended to work only in selected category queues. |
| Messaging Workflow (Facebook and Instagram) | Social Messages for Facebook and Instagram. | Inbox Categories do not restrict Facebook and Instagram Social Messages. |
| Customers | The Customers directory and customer records. | Includes adding customers. |
| Agents | Settings → Team → Agents: add, edit and deactivate people, and set their roles. | Allows assigning Full access to other people. Grant only to trusted administrators. |
| Roles | Settings → Team → Roles: create, edit and delete roles. | Give to administrators only. |
| Social Monitor | Public comments and replies, keywords and connected pages. | Replies are public. |
| Marketing Intel | Reports, templates and run history. | Keys and connections are under Settings. |
| Settings | Channel, AI, Marketing Intel, notification and email settings. | Contains connection credentials, including access tokens and API keys. Grant only to administrators. |